CineMaster help guide
Welcome to the Christie CineMaster™ Help Guide. We created this document to help you use this tool to find the perfect projector, lamp, and lens combination that fits your cinema. Each section below corresponds to an input metric on the calculator and explains how to provide the best input.
Select “Projector Type” first
The resolution and illumination type are an individual preference. You can learn more about what is available and benefits of technologies at lamptolaser.com.
Select your preferred resolution and illumination:
- 2K Xenon
- 4K Xenon
- 2K Laser
- 4K Laser (default)
Working with screen dimensions
Entering accurate values for screen dimensions into CineMaster is important to ensure the output produces a working solution. The input fields for screen dimensions were designed to be as easy and quick as possible and help to avoid erroneous input. Here are a few guidelines to keep in mind when entering screen dimension data.
- Selecting “m” for input units displays values in decimal meters, for example 13.72m (equivalent to 1,372cm)
- Selecting “ft” for input units displays values in decimal feet, for example 24.33ft (equivalent to 24’ 3.96”)
- Selecting “Standard Aspect Fixed Width” sets the linked scope and flat dimensions to use common width between the two formats adjusting the image height when shifting from one to the other.
- Selecting “Standard Aspect Fixed Height” sets the linked scope and flat dimensions to use common hight between the two formats adjusting the image width when shifting from one to the other.
- The flat and scope dimensions are linked so adjusting one will change the other three to maintain proper aspect ratios for flat and scope using either fixed height or fixed width selected.
- Screen input dimensions are linked to preserve proper flat and scope aspect ratios which may differ from your screen size.
- The resulting image dimensions produced by CineMaster are how the image will be projected without cropping.
- Care should be taken to make sure the image will fit on the screen you have even if your screen aspect ratios are slightly off.
- Compare the screen dimensions you have with the image dimensions in CineMaster to make sure the image will cover the largest dimension; any resulting overspill with the other dimensions will need to be cropped.
- The “Projection Throw” distance is the distance from the projector lens to the screen surface.
- The throw distance will adjust the lens selection to make sure the image can be magnified to fill the entire screen.
- The throw distance entered must be the distance from the projector lens to the closest place on the screen surface, which is not always the center.
- Screens that have a projected down angle will have this closest distance near or at the top of the screen depending on how much angle there is.
- Screens that have a curve could have the closest distance at the horizontal edge depending on how much curve there is.
- Some screens are tilted forward or back which should be considered when selecting the shortest throw distance.
- If you are measuring an existing screen, use a laser ruler and move the spot around on the screen until it reads the shortest distance.
- If the screen is not installed yet, you can get the proper throw distance from the auditorium drawing.
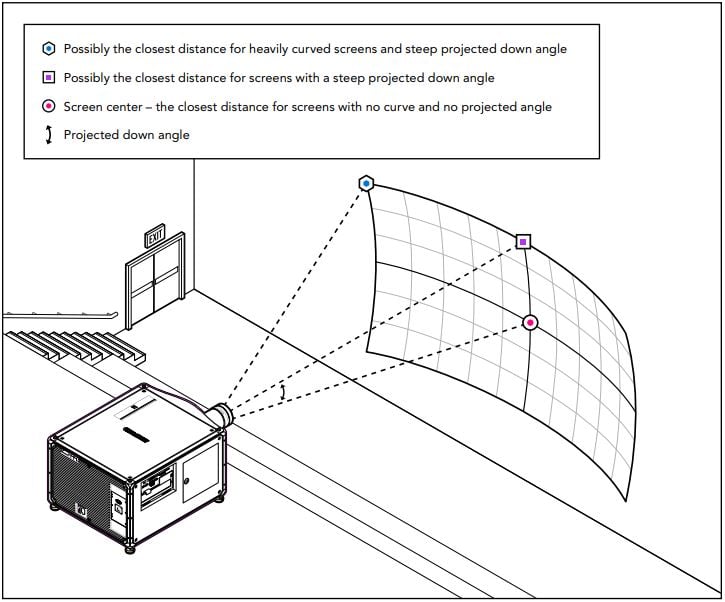
Examples of how the throw distance can be different from lens to screen center depending on projected angle and screen curve.
Lens options
There are up to six different lens options depending on the system selected. You can customize your system by selecting a lens with higher sequential contrast and improved image sharpness. All higher contrast lenses (HC and UHC) will improve contrast with a brightness reduction trade-off. CineMaster uses information about the lens you select to properly size the projector selection to ensure brightness output is sufficient. To learn more about which lens is right, see the Cinema Lenses page on our website: Christie cinema lenses
High Brightness (HB)
- Provides standard 2,000:1 contrast and 100% rated brightness when used with any compatible Christie cinema projector.
High Brightness Premium (HB-P)
- Provides standard 2,000:1 contrast, 100% rated brightness and Premium image sharpness with reduced lateral color error when used with any compatible Christie cinema projector.
High Contrast (HC)
- Provides better than standard contrast of 2,200:1 for Xenon projectors and 2,400:1 for RGB laser projectors with approximately 90% rated brightness when used with any compatible Christie cinema projector.
High Contrast Premium (HC-P)
- Provides better than standard contrast of 2,200:1 for Xenon projectors and 2,400:1 for RGB laser projectors with approximately 90% rated brightness and Premium image sharpness with reduced lateral color error when used with any compatible Christie cinema projector.
Ultra-High Contrast (UHC)
- Provides far better than standard contrast of 6,000:1 for RGB laser projectors with approximately 70% rated brightness when used with any compatible Christie cinema projector.
- Not suitable for use in Xenon projectors
Ultra-High Contrast Premium (UHC-P)
- Provides far better than standard contrast of 6,000:1 for RGB laser projectors with approximately 70% rated brightness and Premium image sharpness with reduced lateral color error when used with any compatible Christie cinema projector.
- Not suitable for use in Xenon projectors
Selecting 3D for your cinema
When you check the “Include 3D” box, CineMaster will reveal more settings to help you select a system that will accommodate both 2D and 3D images on one screen. The output will now include Brightness calculations for 2D and 3D formats.
What brightness is right?
CineMaster lets you enter the brightness you require for both 2D and 3D, then select a system that will produce at least the brightness you have entered. This value represents the brightness you require in the center of the screen.
- The brightness standard for cinemas according to SMPTE 431-1-2006 is 14fL for 2D presentations in the center of the screen.
- The default 3D brightness is set to 6fL and is commonly used.
- If specially graded cinema content with higher brightness requirements will be used, the brightness entered should match that requirement.
- Increasing the brightness values will cause CineMaster to select a projector with higher brightness capabilities.
- For brightness requirement value entry, CineMaster uses foot Lamberts or fL which is the most common units used for reflected screen brightness today. The SI equivalent units are becoming more popular. Candela per meter squared (cd/m2) is also known as nits. To convert from nits to fL divide nits by 3.426 to get fL to use in CineMaster.
3D system efficiency
Providing accurate 3D system efficiencies will allow CineMaster to select a system that can provide the required brightness.
- 3D system efficiency is defined as the percent brightness difference between 2D and 3D formats using the same projector at the same power settings. 3D brightness is the perceived brightness measured through the 3D glasses with any 3D equipment in place and activated.
- The default value in CineMaster for 3D efficiency is 27% and should be changed to reflect the system being used. The 3D system manufacturer will have this information.
Light drop-off due to lamp age and power headroom
Providing required brightness power headroom will allow CineMaster to select a system that can maintain the brightness needed over the expected lifetime of the projector.
Light drop-off due to lamp age (%) appears when a Xenon projector type is selected at the top.
- This value is the brightness power headroom that is used to select a projector lamp combination that can produce enough brightness to allow stable brightness output through the life of the lamp.
- The default value is 25%, if this is increased, CineMaster will increase the lamp / projector size selection which will reduce the power needed to the lamp when it is installed new.
- Watch for warnings if you select a projector or lamp with too much headroom. Typically, Xenon projector lamp power supplies can only reduce to about 65%.
- The recommended setting is minimum 25% which will select a lamp that will maintain sufficient brightness out to the lamp’s estimated average expected life (hrs) if the system is operated in accordance with the guidelines in the “Best Practices for Lamp Usage” on page 8 of the “Xenolite Lamp Brochure”.
Power headroom (%) appears when a laser projector type is selected at the top.
- This value is the brightness power headroom used to select a projector that can produce enough brightness to allow stable brightness output throughout the life of the laser projector.
- The default value is 30%. If this is increased, CineMaster will increase the projector size selection which will reduce the laser power needed when it is installed new. This brightness headroom will allow the laser power to be increased slowly over the life of the projector maintaining required brightness. When the laser power reaches 100%, the brightness will slowly start to fall below the required center brightness.
- The recommended setting is minimum 30% headroom which will select a laser projector that will maintain sufficient brightness out to an estimated 50,000 hours if the system is operated in accordance with the guidelines in the “Cinema RGB Pure Laser Best Practices”.
Screen gain
Screen reflectivity or gain, plays a big part in how much of the projected light reaches the viewer’s eye. There are many different types of cinema screens to choose from, each with their own characteristics. A new screen will have a reflectivity rating that can be used in CineMaster input. As screens age, gain will change, possibly by a large amount, resulting in light loss. If the screen is not new or the gain is unknown, measurements can be taken using a matte white reference to determine the actual screen gain. It is very important to enter an accurate number for screen gain in CineMaster.
- CineMaster uses default values of 1.4 for 2D screens and 1.8 for 3D screens which are common in cinemas. Screen gain should be changed from the default to the most accurate value possible.
- Accurately measuring screen gain requires a matte white reference surface, and an appropriate light spot meter with tripod.
- For more information on screen gain and how to accurately measure, see the “Screen Gain and Port Glass Efficiency” document located in the Reference Library or contact Christie tech support.
Port window efficiency
Good quality projection port window glass will block very little light to the screen. Typical high quality port glass is of a specific type with anti-reflective treatment which increases transmissivity by reducing back reflection. If the glass is not new or transmissivity or efficiency of the glass is not known, light measurements can be taken to verify the efficiency.
- CineMaster uses a default value of 98% for port glass efficiency which is common for new optical quality cinema port glass. This value should be updated with the most accurate information available.
- Accurately measuring port glass efficiency requires moving the port glass out of the projection path.
- For more information on port glass efficiency and how to accurately measure, see the “Screen Gain and Port Glass Efficiency” document located in the Reference Library or contact Christie tech support.